 To make the invitations for Hannah's party, I started with a piece of white scrapbooking paper and painted the general shape of hairdos, faces, dresses, crowns and wings all over the paper, being sure to paint a little askew and messy. After the paint dried, I used a black gel pen (G2's are my favorite) to draw the fairies and princesses. I took the idea from the Usborne book, 50 Fairy Things to Make and Do, which gives lots of cute examples to copy, although the princess crowns were my own idea, as were some of the hairstyles, wings, etc. After the ink dried, I cut out the shapes. The pink paper is also sturdy scrapbooking paper and the clouds paper is a digital scrapbooking paper by Emily Merritt, overlaid with a low-opacity box and text in Photoshop and printed on normal computer paper. Fonts are mostly by Kevin and Amanda. A double-sided foam tape would add depth to this kind of card, but I didn't have any around. I think it is cute without it but it would add a nice touch! I ended up with a few left-over fairies so I decorated each envelope front with them. I expected to have lots of fairy and princess rejects, but oddly enough I only threw one out! I guess the style is very forgiving... and they sure are cute!
Monday, February 22, 2010
Fairytale invitations
To make the invitations for Hannah's party, I started with a piece of white scrapbooking paper and painted the general shape of hairdos, faces, dresses, crowns and wings all over the paper, being sure to paint a little askew and messy. After the paint dried, I used a black gel pen (G2's are my favorite) to draw the fairies and princesses. I took the idea from the Usborne book, 50 Fairy Things to Make and Do, which gives lots of cute examples to copy, although the princess crowns were my own idea, as were some of the hairstyles, wings, etc. After the ink dried, I cut out the shapes. The pink paper is also sturdy scrapbooking paper and the clouds paper is a digital scrapbooking paper by Emily Merritt, overlaid with a low-opacity box and text in Photoshop and printed on normal computer paper. Fonts are mostly by Kevin and Amanda. A double-sided foam tape would add depth to this kind of card, but I didn't have any around. I think it is cute without it but it would add a nice touch! I ended up with a few left-over fairies so I decorated each envelope front with them. I expected to have lots of fairy and princess rejects, but oddly enough I only threw one out! I guess the style is very forgiving... and they sure are cute!
Saturday, February 20, 2010
My portable craft station
 I have the best husband. This Christmas he got me this amazing craft organizer and it has saved my sanity where crafting is concerned. I had previously "organized" my supplies by trying to keep track of 15 different shopping bags with items from 20 different projects, a FedEx box of fabric, a baggy of yarn, a gift bag with a knitting project, a paper bag with a half-finished doll, a drawer full of fabric pieces, elastic and a couple patterns, a shelf with knitting needles and tulle, scissors hidden in one of those bags, a tape measure was around there too, no clue where that pin cushion got to.... I could go on, but you get the point. Total. Chaos.
So on Christmas Day I brought arm loads of supplies downstairs, piled them up and started sorting. In the end, I had my well-stocked organizer, a box of fabric, a bag of yarn, and no more clutter! Now, when I need scissors or a tape measure, or a safety pin, or a specific thread color, or anything, I know right where it is! I love how easy it is to haul around too. It is getting heavy with all I have packed into it (much more than in the pictures!), but I have saved myself so many trips upstairs and down just by keeping all my supplies in one tote that I can bring to any part of the house.
The grand tour:

Front: Scissors pocket for sewing and craft scissors
Pocket for rotary cutter and seam ripper
Pocket for knit fabric scraps (for doll necks and noses)
Main compartment has pin cushion, safety pins, craft sand, cellophane bags, size 0-15 circular needles
Tiny pockets for crochet hooks, cabling needles, yarn needles, metal and leather thimbles, machine oil, machine lint brush, machine needles of various kinds, dressmaker pencil, regular pencil, chopsticks, doll freckles pen, ballpoint straight pins.
Sides: pocket for pattern envelopes, pocket for my homemade patterns, velcro, straight knitting needles, rubber bands, embroidery thread, dental floss, red beeswax crayon
Back: pockets for buttons, tape measures, hand-sewing needles of various kinds
Main compartment for lint roller, bandaids, ribbon, size 0-15 DPNs
Zipper pocket: elastic, twill tape, short cotton stockinette lengths
Inside area: thread box and cotton yarns
Friday, February 19, 2010
Mary Jane slippers
 Yes, yes... I know I didn't need to start ANOTHER knitting project right now, but I had to face facts. My feet are cold and my slippers had huge holes. I guess I got too jealous of my dollies all getting toasty little knit slippers so I broke down and started knitting. I'm making the pattern up as I go, starting with a simple toe-up sock method, cast off about 1/5 of the stitches and continued on. I intend to crochet around the opening in sock monkey brown and add two straps of some kind to the top.
Remember when I said I turned Ginny's first blanket into a bunch of tiny projects? Here's more of that yarn... Caron Wintuk (heavy worsted weight). The sock monkey brown was for that blanket too. Good thing it was a cute combo even if the blanket didn't turn out!
Also, remember when I said I was having trouble with my double-pointed needles? It turns out Caron Spa yarn is extremely slippery and extremely splitty, so it turns out I have having yarn trouble, not needle trouble. DPN's with a normal-textured worsted weight yarn was just as easy as everyone said it would be!
Wednesday, February 17, 2010
Wordless Wednesday: Free fonts!!!
Yes, I adore this fonts site. Check it out. It's all free.
http://www.kevinandamanda.com/fonts/
http://www.kevinandamanda.com/fonts/
Tuesday, February 16, 2010
A note on thread
 I am in love with Gutermann. There, I said it. I am a thread snob and proud of it. I used to use whatever was cheapest, but I got so fed up with breaking threads and clogged sewing machines that I switched completely to Gutermann and think everyone else in the world should to. It is fabulous stuff.
Why? Well, it might seem redundant, but because you don't have to worry about clogged machines and broken threads. Gutermann 100% polyester is the best all-purpose thread out there. It sheds less fiber than other threads and is stronger than other brands. If you sew with regularity, using Gutermann extends the time between machine services, so really, the few cents extra per spool pays for itself!
And while we're on the subject, who says it's expensive

thread? You can buy a small spool of 100 yds for $1.70 or so at most fabrics stores. Joann's puts their Gutermann thread on sale at 50% off very regularly--I think about once a month. That puts a small spool at about 85 cents. If you buy an economy spool (like my daughter is proudly showing off above and below) at half off, you will spend $4 for 1000 yards which works out to less than half the price per yard as the small spool. Not too shabby.
Lastly, I'll show off my current Gutermann collection because it makes me happy to think of how many projects I will get out of all those lovely colors! :)

Saturday, February 13, 2010
My intro to soap making
 I love a good DIY project. It is so satisfying to know I saved money, did something useful, and cut one more item from our list of store-bought necessities, but even I know that making soap seems a little... pioneerish. However, I had a problem. My normal soap shop, Bluehouse Soaps, closed temporarily for a family move last summer and has still not opened. Thankfully, just before closing, I ordered almost a year's worth of soap and hoped they would be back in business when my stock ran out, but alas... my last bar of all-natural "mermaid soap" is gone. I had to make a choice... try out a new online store (which I might not like, would likely cost more, and I would have to order a lot to justify the shipping), switch to all-natural soaps from a store (which aren't nearly as nice as homemade ones), or just make it myself.
Why even both with natural soaps? It's mostly a sensitivity issue for our family. All four of us react in one way or another to agents in most commercial soaps. I have to be extremely careful with Ginny's soap because commercial soaps make her miserable, but many natural soaps dry her skin too much, so it has to contain oatmeal and other natural moisturizers... try finding a soap like that at Target! I am also leery of introducing unnecessary chemicals when they can easily be avoided. Who knows what's harmful and what's not, so I'd rather skip the SLS, phthalates, and perservatives when there are plenty of chemical-free alternatives.
So, back to the soap making. After a shower with my shrinking bar of "mermaid," I set out to find out how hard it would be to make myself. I mean, I wasn't going to mix animal fat and ashes, but if there was an easier method it might be worth a shot. And I found one! A method known as "melt and pour" is the perfect start to making soaps just the way you want them with none of the nitty-gritty. Simply put, you buy a soap base, melt it and add your "extras" and let it harden again!
 Like I said, we have sensitivity problems and Ginny needs that moisturizing element, so I went with two high-quality bases from Brambleberry: one made with olive oil for moisturizing properties and one made with goat's milk for soothing properties. I got a couple of nice scents for Hannah and I, one that smells like oranges and strawberries, and one that smells like cookies. For Ginny and Lee who react to scents, I got some grapefruit essential oil which, in my experience, smells just like lemon meringue pie when it's put in soap! I had intended to mix the bases together, but just for fun, I separated them in layers and scented it like cookies for my first bar. The bottom base (goat's milk) is normally a pure white, but I mixed in organic baby oatmeal.
Isn't it beautiful??? Who needs expensive soap molds when you have an empty margarine container! The soap smells like heaven too. In fact, my husband was so inspired by the delicious scent that he decided to make chocolate chip cookies while the soap hardened in the kitchen. Unfortunately, I had to cut the lovely bar in half so it would fit on a soap deck, but in doing so separated the two layers. They seemed to have melted together again, but I don't know how permanently! I guess mixing bases is a better way to start after all.
My last "mermaid" is now completely used up, so I put my new soap to use this week and I have to say I'm impressed! The goat's milk base lathers up very nicely for a homemade bar soap and with all the extra moisturizing parts (olive oil, oatmeal, and goat's milk), my skin felt even softer afterwards than normal!
Thursday, February 11, 2010
Paper doll chains
 This is a fun and easy craft for elementary-aged kids! Using a folded piece of paper, make a chain of dolls (or fairies, princesses, people, gingerbread men, etc.) to decorate! Your kids will love seeing their shapes unfold all holding onto the hand of the doll/fairy/person next to them!
You will need:

Paper
Scissors
Craft supplies to decorate with, for example:
Crayons, pens, markers, colored pencils, etc.
Aluminum foil
Colored paper pieces
Yarn
Glitter glue
Tulle
Tape
Magazines
Bits of fabric
Ribbon
Start by folding your paper in half the long way. Then fold it twice in the other direction. It helps your design to lay flat if you make these folds accordion-style. Next trace the outline of the shape you will cut out on the top section of your paper just like you were drawing on the front of a homemade card. Make sure that the hands extend to both sides of rectangle. I have created a couple of ideas for shapes here... the first can be used as a princess or a wizard and the second as a ballerina or a fairy. Once your design is drawn, cut it out through all the layers EXCEPT for the hands. Those need to remain attached on both sides for the chain effect to work. When you unfold them you will have two separate chains of dolls. You may use them separately, or tape them together. Depending on how you choose to decorate, you may wish to tape them together after they are decorated, or temporarily just from the backside.
Now use your imagination and supplies to create 8 different versions of your shape! You can use fabric bits to create clothes, yarn pieces for hair or beards, colored paper for wings, aluminum foil to look like metal pieces or add shine, cut faces or hands out of magazines for your people, glue some ribbon to your princess' pointy hat... you name it! Get creative and have fun!
Wednesday, February 10, 2010
Wordless Wednesday: Valentine's Day mug cozy
 Doesn't this mug cozy make you feel warm and fuzzy inside? Using a simple stranded knitting (also known as Fair Isle knitting) pattern makes this mug cozy even thicker and warmer. It is a small project and uses worsted weight yarn and US 8 needles, so even those of us new to stranded knitting should be able to finish this for our loved ones by Valentine's Day!
 Click here for the designer's website, the story behind the cozy, info on the yarn and on Fair Isle/stranded knitting. For the free pattern, look for the link in between the two cozy pictures on her site (Classic Elite Yarns).
Monday, February 8, 2010
Intarsia knitting
This first row of intarsia knitting on my afghan has a white moss stitch border, a square of white, a square of watermelon (raspberry pink), a square of white, a square of blue mint (turquoise), and another white border. All told, five skeins of yarn going at once! Normally, intarsia knitting is done with smaller patterns where you can trail a couple of yards of yarn behind the work or create small "bobbins" by winding up a section of yarn so it pulls from the center (see photo below).
 Unfortunately, since each block of my blanket will require nearly a whole skein, there is no way to get around working with so many full skeins at once. The main hang up I am having now is having to untwist all of them from each other at the end of a few rows! But I am enjoying the color changes, the new technique, and seeing the project slowly take shape. Blanket progress: 5 inches down, 55 inches to go! Oy.
Here is an excellent video on intarsia knitting, shown in both Continental and English styles: http://www.knittinghelp.com/videos/advanced-techniques Scroll about 2/3 of the way down to "How to knit with 2 colors at a time" and intarsia knitting is the second technique.
And here is the backside with the strands twisted around each other at each color change.
I realize my yarn is in a maternity clothes shopping bag, but I am not making any subtle announcements! It was just left over from a baby shower and a handy size. :)
Saturday, February 6, 2010
Adventures in cable knitting
 Up until recently I have been a rather timid knitter. I was content to knit and purl on straight needles and stuck to single-color patterns that required as few increases and decreases as possible, and preferably on nothing smaller than US 6 needles. I finally decided last month that, since I have been knitting off and on for the last five years, it is time to move on to some more advanced techniques.
My first major discovery was ravelry.com! Yes, a majority of the patterns they list are not free, but there are so many that it doesn't matter! Excellent, cute, creative, impressive, stunning, and unique free patterns abound even if they are not the majority! One morning I casually browsed through patterns I ended up with ten saved that I "had to make," so it's plenty to keep even the most skilled knitter busy for years! I picked one called "Tillamook Cabled Hat" by Rilana Knits mostly because I loved the look and second, because I love the Pacific Northwest and Tillamook cheese, so the title made me happy!
My first challenge: learning a cable cast-on. This site was extremely useful, with videos for both Continental- and English-style knitting. The cast-on itself wasn't hard at all... so why, you might ask, was I struggling and grumbling and hurling curses for three hours straight trying to cast-on a silly hat??? I'll blame that on my double-pointed needles. I had never previously used DPNs, but friends had assured me that they are harmless good fun and nothing to be scared of. Now surely a somewhat experienced (and timid) knitter like myself would be able to tackle them without a sweat, but apparently DPNs, cable cast-ons and myself do not work well together. Maybe the relationship just needs some work. In any case, at long last, I was fully cast-on and ready to start knitting-in-the-round.
After the cast-on, DPN's became increasingly less aggravating with each row, and by the time my 1 1/2 inches of hat ribbing was complete I started to pick up pace. After conquering those two hurdles, the challenge I had originally been scared to face, cabling, was a piece of cake. It was an "....oh, that's it?" moment in knitting for me. My progress so far is in the picture at the top of this post.
So take it from me, if you can knit and purl, don't be afraid of cabling! But you can go ahead and be afraid of your needles. After all, there's ten pointy ends to watch out for in a pack of DPNs. That's a lot of points.
Thursday, February 4, 2010
Meet Kendra
 I just love this little doll! Kendra is 12" tall, has chocolate brown skin, espresso brown hair, black eyes, and rosy cheeks. I adore the print on her skirt... in fact, it is made from a remnant of fabric left over from an outfit I made for my own daughter's "baby." It is light pink with small doodles of hearts, flowers, four-leaf clovers, and bugs, and is covered with cursive-writing words like "play," "dance," "believe," etc.
My favorite thing about Kendra's outfit is her hand-knit cotton tank top. I came up with the pattern for it specifically for this doll and it turned out so cute! It has a small band of ribbing on the bottom, stocking stitch on the body, and garter stitch on the straps. It buttons in the back for easy removal and looks so cute even without the layering shirt! I can see myself making lots of these tanks for summer dolls.
Visit my Etsy shop!
Wednesday, February 3, 2010
Wordless Wednesday: Amigurami
Come visit Stitch and Stuff on Wednesdays for a some amazing and inspiring craft ideas! I will post photos and links to projects that I think look fun and creative, but I haven't tried yet!
This week: Amigurami! In other words, tightly crocheted or knitted stuffed animals and toys, often with oversized heads.
 An adorable little (and easy!) amigurami gnome!
Link to the pattern and blog

Easy ice cream cones! These ones contain small plastic cups for rigidity plus stuffing. Link to blog and pattern
 One of those oversized heads I was talking about: an adorable bear named Zequi! Link to the pattern and blog

Amazing (and difficult) dragon pattern!
This week: Amigurami! In other words, tightly crocheted or knitted stuffed animals and toys, often with oversized heads.
An adorable little (and easy!) amigurami gnome!Link to the pattern and blog
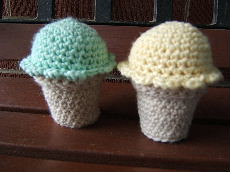
Easy ice cream cones! These ones contain small plastic cups for rigidity plus stuffing. Link to blog and pattern
One of those oversized heads I was talking about: an adorable bear named Zequi! Link to the pattern and blog
Amazing (and difficult) dragon pattern!
Tuesday, February 2, 2010
Forget Bisquick

I have been baking all my life, but I didn't realize until last year that Bisquick isn't required for tasty, fluffy, and easy pancakes and waffles! We were looking to save money on our grocery bill and didn't feel like paying $4.50 for another box of Bisquick, so my husband went hunting for recipes and experimented with them as only a good scientist can. Within a few weeks of breakfast taste-testing, we had found ourselves a couple of great recipes!
Good Old Fashioned Pancakes (original, slightly different, from allrecipes.com)
1 1/2 cups of flour
3 1/2-4 tsp baking powder (more for fluffier pancakes)
1 tsp salt
1 tbsp sugar
1 cup warm milk, add up to 1/4 more if it's too thick
1 egg, beaten
3 tbsp melted butter
Sift together dry ingredients. Make a well in the center and pour the warm milk, egg, and melted butter inside (this helps ingredients to mix well). Mix with whisk until smooth.
Cook like you would Bisquick pancakes: a little cooking spray or oil if needed, heat the griddle to medium heat, and cook about 1/4 cup sized pancakes until brown, then flip.
Classic Waffles (original, slightly different, from allrecipes.com)
2 cups flour
1 tsp salt
4 tsp baking powder (add to this if your waffles aren't fluffy enough)
3-4 tbsp sugar (beware, with 4 you may experience some caramelizing and sticking)
2 eggs, beaten
1 1/2 cups warm milk
1/3 cup melted butter
1 tsp vanilla extract
Pre-heat waffle iron. Sift together dry ingredients in a medium-sized bowl. Make a well in the center and pour the eggs, warm milk, melted butter, and vanilla inside. Mix with whisk until smooth. Ladel batter into pre-heated waffle iron and cook until golden brown.
Enjoy!
Monday, February 1, 2010
A quick peek into my workshop
While I prefer making one doll beginning-to-end, more often than not I find myself making dolls in batches to save time. The current line up is planned as follows:
-light-skinned 12" boy with blue eyes and brown hair, probably a little country boy or cowboy with overalls and a straw hat
-light-skinned 12" Asian girl with kimono or similar clothes
-tan-skinned 15" cowgirl with brown hair and eyes
-light-skinned 15" red head with green eyes and fairy wings
So look for them in the next few weeks in my shop! Of course, they might change slightly as I go, but that's the current plan!
I'm simultaneously making a 17 1/2 - 18 inch doll for my daughter's birthday next month. I have never made one quite this large and am having fun putting her together!
Here is the line-up getting their legs sewn on:
 All of my dolls come with their bodies and heads reinforced with a second layer of high-quality 100% cotton interlock, hence the white fabric on top... it will layer their insides when flipped properly.
So there you have it... a small peek into my doll-making world!
My Etsy Store
Subscribe to:
Comments (Atom)

