Last week went great! I even added a downstairs-cleaning day where the floors got mopped, the kitchen got surface cleaned, the microwave got cleaned, the tables and chairs got a thorough scrub-down, and the entire downstairs got dusted! I did not work on my crafts last week, however. I was too distracted because my husband accepted a job offer! We are very excited since we have been waiting for this for eight months.
Here is this week's checklist. M indicates "finished on Monday", T = "finished on Tuesday", etc.
M T W T F S S
Daily Tasks: Morning:
Get dressed, including glasses, shoes, hair and make-up M T W T F S
Make bed M T W T F S
Clean bathroom sink, surfaces, toilet, dust and spot-clean M T W T F S
Get girls dressed M T W T F S
Do girls' hair M T W T F
Make girls’ beds M T W T F S
Start a load of laundry M T W T F S
Breakfast for girls and myself M T W T F S
Put away dishes M T W T F S
Wash breakfast dishes M T W T F
Check dinner plan and defrost or crock pot if necessary M T W T F S
Afternoon:
Wash lunch dishes M T W T F
Start dinner prep at 4:00, 1:30 if defrosting bread M T T F
Start dishes during dinner prep M T W T F
Fold and put away laundry M T W T F
After Dinner:
Put kids to bed M T W T F
Finish dinner dishes M T W T F
Wipe down kitchen M T W T F
Sweep kitchen floor W
Pick up house M T W T F
Put glasses and keys in purse M T W T F
Charge phone if needed
Put together diaper bag if outing is planned
Bedtime:
Bedroom floor picked up M T W T F
Drawers shut and surfaces clutter-free M T W T F
This week's tasks:
Monday:
Empty trash cans S
Dust M
Clean mirrors M
Scrub around sinks with a toothbrush M
Vacuum T
Purge mail M
Tuesday:
Change sheets T
Deep clean this week’s house zone for 15 minutes T
Work for mom T
Wednesday:
Work on Tiana doll or G's dress T
Thursday:
Work on Tiana doll or G's dress S
Friday:
Bake bread F
Clean out purse F
Declutter car S
Wash car if needed S
Finish Tiana doll Worked on other doll
Monday, May 17, 2010
Wednesday, May 12, 2010
Meet Oliver


This is Oliver.... a custom 14-15" boy doll with espresso hair and eyes, tan skin, and rosy cheeks! His hair is made of a cotton/linen blend yarn. He is on his way to his new home and I miss him already!
Tuesday, May 11, 2010
DIY: Housekeeping week 2
Last week was pretty good. I got the majority of my daily stuff done but let a few minor things slide since the kids were sick. This week I'm fighting the laziness bug and winning so far... we'll see how I've done by the time Friday comes!
Here is this week's checklist. M indicates "finished on Monday", T = "finished on Tuesday", etc.
M T W T F S S
Daily Tasks: Morning:
Get dressed, including glasses, shoes, hair and make-up M T W T F S S
Make bed M T W T F S S
Clean bathroom sink, surfaces, toilet, dust and spot-clean M T W T F S S
Get girls dressed M T W T F S S
Do girls' hair M W T F S S
Make girls’ beds M T W T F S S
Start a load of laundry M T W T F S
Breakfast for girls and myself M W T F S S
Put away dishes M T W T F S S
Wash breakfast dishes M T W T F S S
Check dinner plan and defrost or crock pot if necessary M T W T F S
Afternoon:
Wash lunch dishes M T W T F S S
Start dinner prep at 4:00, 1:30 if defrosting bread M T W T F S
Start dishes during dinner prep M T W T F S
Fold and put away laundry M T W T F S
After Dinner:
Put kids to bed M T W T F S
Finish dinner dishes M T W T F S
Wipe down kitchen M T W T F S
Sweep kitchen floor T F
Pick up house M T W T F S
Put glasses and keys in purse M T W T F S S
Charge phone if needed F
Put together diaper bag if outing is planned S
Bedtime:
Bedroom floor picked up M T W T F S S
Drawers shut and surfaces clutter-free M T W T F S
This week's tasks:
Monday:
Empty trash cans M
Dust M
Clean mirrors M
Vacuum
Purge mail M
Finish Oliver clothes M
Tuesday:
Change sheets T
Deep clean this week’s house zone for 15 minutes T
Work for mom T
Doll photo session and ship T
Wednesday:
Meal plan W
Make grocery list W
Henry's Market for produce W
Work on Tiana doll
Thursday:
Stater's grocery shopping T
Asian market shopping
Work on Tiana doll
Friday:
Clean out purse
Declutter car T
Wash car if needed
Work on Ginny's dress
Saturday:
Work on G's dress
Family over for G's birthday S
Monday, May 3, 2010
DIY: Housekeeping!!

Confession: While I am 100% a Suzy Homemaker, I am messy. No, I don't mean I leave the dishes unwashed for three days straight or forget to vacuum every week, I mean I leave my dishes unwashed for a week and a half and my kids' spaghetti stays stuck to the floor until it dries, sits there for a week, and gets carried off by an army of ants. My house gets GROSS. For the time being, we are living with my parents, so my level of grossness needs to be contained for their sanity. All the same, our bedroom constantly overflows with half-unwashed, half-washed-but-not-folded laundry piles that evade each other's territory, receipts, fliers, books, DVDs, boxes that need to be stored, bags that need to be sorted, etc, etc, etc. The kids' rooms aren't much better, just less centralized.
In March, just before we left on our Ohio trip, I did a complete overhauling of our rooms. The laundry was finished, folded and put away. The papers were sorted and filed or tossed. Boxes and bags went to storage, even more went to the trash, Goodwill got their share of the pile, and I got reacquainted with the sight of our bedroom floor. Then I vacuumed, dusted, and we took off for Ohio. We stayed with dear friends of ours, a couple with three children around our kids' ages. During our ten days there, I took note of the housekeeping practices of my friend. I was amazed that with an extra child (with the energy of three kids combined in a single body for that matter), a bigger house, and more obligations, she kept a relatively neat house. If it had been spotless, I wouldn't have noticed, but the floors regularly had crumbs, toys weren't immediately put away, and they went to bed with a few dishes in the sink most nights. What was she doing to keep the crumbs, dishes and toys from turning into an entire house that internally explodes within 24 hours of being cleaned??? Whatever it was, I wanted it. I hate my messy tendencies and hate that I have to be ashamed of my house or my bedroom.
I don't know how it came about, because I didn't come home with a plan or a thought to change, but I shortly after arriving home to my freshly cleaned living space, I discovered www.flylady.net. I thought "this is PERFECT! It's just the sort of system I could actually get behind and USE!" The great part is, you don't start big... just do one "baby step" the first day, add something else in addition the next day, and so on until you've slowly developed a series of routines that maintain your house and keep it from exploding on itself.
Since I don't have a whole house to myself, I've changed things up. I don't shine my kitchen sink like she lists as baby step #1... I started by making my bed everyday instead. I cannot believe the difference in two months! I spend about 20 minutes each morning doing maintenance and getting ready, I have a few designated tasks throughout the week, and I make dinners off of a flexible meal plan. Suddenly it's all clicking!
For my own benefit (and yours if you wish!) I will be posting my progress on here every week, the good and the bad. I promise to post fun crafty stuff too! I called this "DIY: Housekeeping" because I have the same attitude toward housekeeping that people often have with the DIY mentality. It's easier not to do it, even if it is a healthier, cheaper, and something to be proud of. I know I'm not the only one in this boat, so check out www.flylady.net if you need somewhere to start! Of course it's not perfect, and some of my issues are as follows: 1. her website and some of her emails are very corny and out-of-date, 2. if you receive her emails you will get a constant stream of testimonials about how amazing her cleaning products are (pure unadulterated self-advertising) when she says she believes in using what you already have, 3. she wants you to spend a portion of your day perusing her website almost from the get-go when internet use is probably the #1 time-waster of homemakers in the US. I personally avoid internet like the plague until my morning routine is done, or I'll never get started. But cut out the parts that don't work for you and give it a shot! You might be as surprised as I am!
Here is this week's checklist. M indicates "finished on Monday", T = "finished on Tuesday", etc.
Daily Tasks: Morning:
Get dressed, including glasses, shoes, hair and make-up M T W T F
Make bed M T W T F
Clean bathroom sink, surfaces, toilet, dust and spot-clean M T W T F
Get girls dressed including hair M T W F
Make girls’ beds M T W T F
Start a load of laundry M T W T F
Breakfast for girls and myself M T W T F
Put away dishes M T W T F
Wash breakfast dishes M T W T F
Check dinner plan and defrost or crock pot if necessary M T W T F
Afternoon:
Wash lunch dishes M T W T F
Start dinner prep at 4:00, 1:30 if defrosting bread M T W F
Start dishes during dinner prep M T W F
Fold and put away laundry M T W T F
After Dinner:
Put kids to bed M T W T F
Finish dinner dishes M T W T F
Wipe down kitchen M T W T F
Sweep kitchen floor M T F
Pick up house M T W T F
Put glasses and keys in purse M T W T F
Charge phone if needed T
Put together diaper bag if outing is planned
Bedtime:
Bedroom floor picked up M T W T F
Drawers shut and surfaces clutter-free M T W T F
This week's tasks:
Monday:
Empty trash cans M
Dust M
Clean mirrors M
Vacuum M
Purge mail M
Tuesday:
Change sheets T
Deep clean this week’s house zone for 15 minutes T
Work on Oliver doll T
Wednesday:
Work on Oliver doll
Look for Nepal photos W
Thursday:
Work for mom
Work on Oliver doll T
Quick grocery store trip W
Friday:
Clean out purse F
Declutter car F
Wash car if needed
Finish Oliver doll
Friday, April 16, 2010
Easy and awesome cake for the amateur cake maker!

One last post on my daughter's birthday and I'll move one... I promise! I know it was already two months ago! To be honest, I just haven't taken pictures of my other projects lately and the birthday pictures are easily accessible. Haha! I'm just that lazy.
OK! So my daughter wanted a Cinderella castle cake. This might seem like a simple undertaking for a creative cake-maker, but cake-making seems a little out-of-reach for me. I mean, I know I could make it taste good, but food presentation, especially with decorative frosting, is not my thing. I am a self-labeled imperfectionist and perfect swirls of frosting are not going to come out of my frosting tube, I guarantee it. So with that in mind, I set out to make a simple cake in a castle shape... at least convincing enough for a four-year-old.
I started by making an ice cream cake. I lined a 9x13" pan with parchment paper and mixed up some confetti cake from a box. Once baked and cooled, I lifted it from the pan and cut it in half. I took a box of strawberry ice cream and cut it in half so I had two slabs, each piece about the size of one half of the cake. I sandwiched this between the two cake halves and cut the cake sides with a bread knife to the edge of the ice cream slab. Next, I cut away the four corners and placed two ice cream cones (cake style) in each corner, first an upside-down one on the base, then a right-side up one on top of it. I used a little ice cream to stick them to the cake and between the cones to stick them together. Once it was covered in plastic wrap, I stuck it in the freezer overnight. The frozen ice cream stuck the cones in place like glue and made the cake very simple to frost!
The next morning, I used a simple buttercream frosting (colored blue of course!) and covered the entire thing... cake and cones. I thought I would have to work quickly to keep the cake from melting, but it turned out that the frozen cake hardened the frosting as I went and made the frosting much easier! I finished with a few sprinkles, but with any imagination and time this castle could be decorated quite elaborately! All in all, this was one of the easiest frosted cakes I have ever made!
Saturday, April 10, 2010
Holly, the princess fairy costume doll!

It has been six weeks since my older daughter's birthday, but we've been living in hectic chaos since then... traveling out of state, having family in from England, my brother and sister-in-law's wedding reception in the backyard, birthday parties, events, you name it. Sadly, my little crafty blog took a back seat for a few weeks, but here is the long-awaited post about Holly and her princess dresses!
Holly is a 17.5 inch tall waldorf doll with light skin tone, big blue eyes, and shoulder-length light brown hair. To encourage bonding to her princess-and-fairy-loving mama, I included five outfits for playtime: Snow White, Cinderella, Tinkerbell, Belle, and Ariel.
Snow white:

This dress was made almost entirely from leftover scraps. The skirt was remnants left over from the Belle costume I made this winter. I am planning on listing it on my Etsy site in the fall. The trim on the bodice front was leftover from the Aurora costume in my girls' dress-up stash, and the sleeves are extra material from my older daughter's birthday/Easter dress.
Cinderella:

This dress was also made from the birthday/Easter dress remnants. The underskirt for both this and the other full-skirted dresses is a simple tulle tutu with long pieces of tulle tied around an elastic loop. It fills out these full skirts very nicely. The sleeves and peplum are made of bubble organza from Joann's... I have never tried it before but it was on sale. I was very pleased with the effect, although I would not have left the edges unfinished at the sleeves if I realized it would fray, but it has been very minor.
Tinkerbell:

I had to experiment with her wings to come up with this effect. I used bubble organza in lavender and sewed a simple butterfly wing shape. I then used thick decorative aluminum wire from the floral section to make the wing frame and stitched the organza closed around it. I then attached the wings to an elastic loop that goes around Holly's waist. The dress snaps in the back around the wings.
Belle:
 This dress was a last-minute add-on. After finishing the rest, I still had quite a bit of yellow material left over, but it turns out it was just barely enough! Each of the skirt swags is made of two very slim crescent shapes sewn together, and this was the last part I cut out of the fabric. After the last of the 16 crescents was cut, I literally had no fabric scrap large enough to make a 17th if it had been necessary! Talk about making good use of my yardage!
Ariel:
 This was a fun little creation! I had been wanting to make mermaid costumes for waldorf dolls for a long time, so I had time to think on how this would be done. There are some adorable waldorf mermaid dolls, but I had not seen anyone make a costume to turn a normal waldorf doll into a mermaid. This was my solution and it turned out great! The top is basically the same as Bell's underdress, but with ribbons as a halter instead of tank straps. Instead of a dress skirt, it is tapered up a bit in the center and finished. The bottom is a stretchy costume material with sequin-dots, and stitched onto the bottom, which extends just past Holly's feet, are strips of green tulle, lavender bubble organza, and the green costume dot material. She is also wearing some Mardi Gras beads here, but even without them, so is a very convincing mermaid!
Of course, being the fiercely independent sewer that I am, I took much poetic license sewing these to make them fit the project in my head, but I started with Simplicity 5705 for general pattern pieces of all princesses except Ariel. Thankfully with a 17.5 inch doll to work with, it was easy to find an American Girl pattern with all the princesses I needed rolled into one pattern!
Monday, March 8, 2010
How to get your hair to look like a shampoo ad.... without the shampoo!
 First off, I want you to picture a shampoo hair model. Think of the last Pantene commercial you saw... the lady with the thick shiny hair magically waving in slow motion in the air as she struts down the street, every strand shining like gold or copper in the sun while a bunch of guys in suits stop and stare. Or think of the hair celebrities flaunt as you're trying to check out at the grocery store. OK, now imagine someone told you that model or actress stopped using shampoo a year ago. "WHAT??? Ewww!"... is it? I second ago that was the most fabulous hair you could imagine! Sounds impossible, but it's not. Over the last couple of weeks I have been experimenting with the Curly Girl method, also affectionately known as the No-'Poo method.
 Now, WHY would I even consider such a thing? I'm really not naive enough to think I could stop washing my hair and no one would notice. I'm a fan of personal hygiene. I don't want to stink. The truth is, I fell into the no 'poo method without meaning to. As most of you know, I try to do things the "natural way" as much as possible, so when I ended up with an extreme case of dandruff this fall, I was hesitant to use medicated shampoos. A bottle of Suave was the beginning of my dandruff misery, so I first switched to an all-natural organic shampoo. This made an incredible difference in my hair texture, but my scalp was still in ruins. Before I headed out to by some T-Gel, I searched online for natural remedies. I found several that I could try from ingredients in my kitchen, so I started testing.
1. Olive oil. At my next shower, I took about 1/4 cup of olive oil and a comb and massaged my scalp and combed for about 15 minutes. Conclusion: REALLY hard to wash out, messy, and didn't seem to make any difference. I have since learned it should have been hot oil, but I was ready to try something else.
2. Baking soda. I made a paste from about 1/4 cup baking soda and 1/4 cup warm water from the shower. Mix it up and apply it to the scalp, massaging vigorously particularly in heavy dandruff areas. Baking soda is highly alkaline, so especially in hard water conditions it must be paired with an acid or your hair will end up feeling gunky and unwashed. So, after this wash I used....
3. Apple cider vinegar. I mixed about 1/4 cup ACV and 1/4 cup warm water and poured it over my scalp and massaged it in gently and let it sit for about 5-10 minutes. Both the baking soda and apple cider vinegar methods were recommendations for dandruff, and needed to be paired together to work properly. The soda exfoliates and removes dirt and excess oil and the vinegar balances pH, soothes the scalp, and works as a natural conditioner.
4. Herbal tea. This same shower I decided to go for the gusto and try another ingredient: peppermint tea brewed just like I was going to drink a hot cup, but instead left to cool a bit, poured over the scalp, and left to sit for 5 mins. I read that herbal teas were excellent for hair, adding nutrients and repairing damage. Finally, I washed with my organic shampoo and called it a day.
My conclusion after this shower.... meh, it worked a bit, but wasn't terribly impressive. I decided to try it again after noticing a few less flakes, and my scalp was again a bit clearer. Each shower seemed to heal my scalp a little more. But then two things happened: my husband decided to try my scalp experiment instead of buying T-Gel, and my daughter squirted the rest of my organic shampoo down the drain.
I casually mentioned to my husband as he headed to the shower with his vinegar, baking soda and tea, that I read this weird method where they skip shampooing entirely. I think it appealed to his scientific nature and he came out a while later announcing he had gone without shampoo. I felt his hair.... perfectly normal, actually. Smell... just a tiny trace of vinegar if you stuck your nose right in it. Interesting. A week into this method and he still looked good... and smelled good too since he took to finishing with peppermint tea!
I, on the other hand, was onto new hair woes. My organic shampoo was down the drain thanks to a four-year-old who was playing "clean the shower" with it. Months ago I had used and loved Giovanni's Triple Tea Tree Treat or whatever it's called, so I had a bottle under the sink to use when my current shampoo ran out. It's all-natural, but not organic. Alas, my love for it died that first shower when my skin started itching everywhere it touched, likely a reaction to the essential oils which I tend to be sensitive to. So the next shower I took the plunge and skipped shampoo for the first time. I did my scalp routine: baking soda deep massage, rinse well (because you don't want to become a human volcano experiment when mixed with the next ingredient), vinegar soak, rinse, tea soak, and rinse. My reaction? Wow. My hair felt AMAZING!
It has only gotten better since!!! I haven't "washed" my hair in a day and a half and it looks and feels softer and cleaner than it normally does straight from the shower! My scalp is nearly cleared up and no longer itches. I looked in the mirror this morning and thought... whoa, is my hair shiny??? It has amazing body, a nice natural sheen, and apparently can go for days without feeling dirty. Why did I not know about this before?
How does it work? Or more importantly, why do you not end up a stinky grease-head after a few days? It turns out that it's the shampoo that causes your hair to become oily after a day or so. Shampoos, like most soaps and detergents, are particularly good at removing oils. In this case, it strips all the natural oil from your hair and your scalp produces extra oil to make up for it. Left alone, your scalp will balance out, providing just enough oil to keep your hair healthy and beautiful. This means most people have a "detox" phase for a few days before the gorgeous hair kicks in. Also, many shampoos have silicone in them which gives an artificial shine but coats each strand of hair and causes build-up over time. The no 'poo method allows the silicone to sluff off and lets your hair shine on its own.
It seems to me that the use of baking soda and vinegar is more often called "no 'poo" while using conditioner to clean hair called "curly girl" but they seem somewhat interchangeable. Anyhow, another way of doing this (which I haven't tried) is buying a nice, silicone-free, preferably natural conditioner and using this as your shampoo. This method works mainly on friction, so working the conditioner into your scalp in a circular motion and working it into the hair for a period of time is essential. The moisturizing properties of conditioner don't have to fight shampoo, so it leaves your hair feeling very soft. This method might take longer for your hair to adjust to, but again, I haven't tried it.
I gave you the amounts of baking soda and apple cider vinegar I use for scalp recovery, but from what I've read, most people use considerably less of each for day-to-day use, even down to a tablespoon. That's my favorite thing about the no 'poo method... it's SO cheap and it's all stuff I already had in my cupboards... you can't get more DIY-happy than that!
Give it a try! You know you want to.
Wednesday, March 3, 2010
The last couple of weeks
I have been a bit distracted from my blog upkeep for the last couple of weeks. For one, I had my 4-year-old's birthday gift and party to plan and work on. For another, we decided it was time to visit family out-of-state, so we have been busy planning for that. Also, I've been trying to finish up a few of the many projects I have been working on. It has been largely a success!
Hannah's birthday gift (to be showcased on here soon) was finished the evening of her birthday, so she was able to open it after dinner. This is the tradition gift-opening time in our family, so I wasn't running that late. Her birthday party went over well. The festivities included craft time (of course!), homemade pizza for lunch, and lastly, a fairy hunt where each girl followed a long twisty, tangled trail of yarn to her very own waldorf fairy styled to look like the little girl who found her! Oh, and how could I forget the fairytale castle ice cream cake?
Our travel plans would normally be straight-forward since we have made this trip many times, but this particular time I had to come up with winter wear for the girls which included trips to thrift stores, Children's Place winter clearance ($1 for a pair of knit, fleece-lined mittens in toddler sizes!), and unearthing stuff in our own stores that haven't been touched in months. I also had to labor over which disposable diapers to bring since we can't check luggage this time and therefore don't have room for a huge cloth diaper stash. This is a quite confusing task for a cloth-diapering mom, actually. Do I really have to spend $15 for a week's worth of diapers? How do I know they'll work? Do I get the expensive ones in case the cheap ones leak, or is that a silly waste of money? And most importantly, how am I supposed to keep her pants on with no cloth to hold it up? ...This is a legitimate concern. My children have no butts but are heavy wetters, so at this age, the waist bands are let out to accommodate for huge diapers. Without that, their pants fall to their ankles. But, without too much grief, I have purchased diapers for the first few days of the trip. Next, how to pack for a lengthy trip when we can't check any luggage? Thankfully we'll be staying with our friends who have three kids around my girls' age, but it is a daunting task nonetheless. Then came the biggest problem by far... my husband found out he needed to be home during one of the trip days! We managed to shuffle meetings and flights and now I am taking one daughter and my husband is following a day later with the other. Phew. Nothing insurmountable, but still time consuming.
In the rest of my time, I have been trying to finish up some of my mostly-completed projects. Just tonight I finished the slippers that I posted about a couple of weeks ago, I am a mere ten rows + decreases from finishing my cabled hat, and this morning I stitched the wig onto my little cowgirl waldorf doll, Tiana. I will try to get pictures posted of my projects as they finish.
But here's something to get started with: a picture of the birthday party after the little fairies were found!

Monday, February 22, 2010
Fairytale invitations
 To make the invitations for Hannah's party, I started with a piece of white scrapbooking paper and painted the general shape of hairdos, faces, dresses, crowns and wings all over the paper, being sure to paint a little askew and messy. After the paint dried, I used a black gel pen (G2's are my favorite) to draw the fairies and princesses. I took the idea from the Usborne book, 50 Fairy Things to Make and Do, which gives lots of cute examples to copy, although the princess crowns were my own idea, as were some of the hairstyles, wings, etc. After the ink dried, I cut out the shapes. The pink paper is also sturdy scrapbooking paper and the clouds paper is a digital scrapbooking paper by Emily Merritt, overlaid with a low-opacity box and text in Photoshop and printed on normal computer paper. Fonts are mostly by Kevin and Amanda. A double-sided foam tape would add depth to this kind of card, but I didn't have any around. I think it is cute without it but it would add a nice touch! I ended up with a few left-over fairies so I decorated each envelope front with them. I expected to have lots of fairy and princess rejects, but oddly enough I only threw one out! I guess the style is very forgiving... and they sure are cute!
Saturday, February 20, 2010
My portable craft station
 I have the best husband. This Christmas he got me this amazing craft organizer and it has saved my sanity where crafting is concerned. I had previously "organized" my supplies by trying to keep track of 15 different shopping bags with items from 20 different projects, a FedEx box of fabric, a baggy of yarn, a gift bag with a knitting project, a paper bag with a half-finished doll, a drawer full of fabric pieces, elastic and a couple patterns, a shelf with knitting needles and tulle, scissors hidden in one of those bags, a tape measure was around there too, no clue where that pin cushion got to.... I could go on, but you get the point. Total. Chaos.
So on Christmas Day I brought arm loads of supplies downstairs, piled them up and started sorting. In the end, I had my well-stocked organizer, a box of fabric, a bag of yarn, and no more clutter! Now, when I need scissors or a tape measure, or a safety pin, or a specific thread color, or anything, I know right where it is! I love how easy it is to haul around too. It is getting heavy with all I have packed into it (much more than in the pictures!), but I have saved myself so many trips upstairs and down just by keeping all my supplies in one tote that I can bring to any part of the house.
The grand tour:

Front: Scissors pocket for sewing and craft scissors
Pocket for rotary cutter and seam ripper
Pocket for knit fabric scraps (for doll necks and noses)
Main compartment has pin cushion, safety pins, craft sand, cellophane bags, size 0-15 circular needles
Tiny pockets for crochet hooks, cabling needles, yarn needles, metal and leather thimbles, machine oil, machine lint brush, machine needles of various kinds, dressmaker pencil, regular pencil, chopsticks, doll freckles pen, ballpoint straight pins.
Sides: pocket for pattern envelopes, pocket for my homemade patterns, velcro, straight knitting needles, rubber bands, embroidery thread, dental floss, red beeswax crayon
Back: pockets for buttons, tape measures, hand-sewing needles of various kinds
Main compartment for lint roller, bandaids, ribbon, size 0-15 DPNs
Zipper pocket: elastic, twill tape, short cotton stockinette lengths
Inside area: thread box and cotton yarns
Friday, February 19, 2010
Mary Jane slippers
 Yes, yes... I know I didn't need to start ANOTHER knitting project right now, but I had to face facts. My feet are cold and my slippers had huge holes. I guess I got too jealous of my dollies all getting toasty little knit slippers so I broke down and started knitting. I'm making the pattern up as I go, starting with a simple toe-up sock method, cast off about 1/5 of the stitches and continued on. I intend to crochet around the opening in sock monkey brown and add two straps of some kind to the top.
Remember when I said I turned Ginny's first blanket into a bunch of tiny projects? Here's more of that yarn... Caron Wintuk (heavy worsted weight). The sock monkey brown was for that blanket too. Good thing it was a cute combo even if the blanket didn't turn out!
Also, remember when I said I was having trouble with my double-pointed needles? It turns out Caron Spa yarn is extremely slippery and extremely splitty, so it turns out I have having yarn trouble, not needle trouble. DPN's with a normal-textured worsted weight yarn was just as easy as everyone said it would be!
Wednesday, February 17, 2010
Wordless Wednesday: Free fonts!!!
Yes, I adore this fonts site. Check it out. It's all free.
http://www.kevinandamanda.com/fonts/
http://www.kevinandamanda.com/fonts/
Tuesday, February 16, 2010
A note on thread
 I am in love with Gutermann. There, I said it. I am a thread snob and proud of it. I used to use whatever was cheapest, but I got so fed up with breaking threads and clogged sewing machines that I switched completely to Gutermann and think everyone else in the world should to. It is fabulous stuff.
Why? Well, it might seem redundant, but because you don't have to worry about clogged machines and broken threads. Gutermann 100% polyester is the best all-purpose thread out there. It sheds less fiber than other threads and is stronger than other brands. If you sew with regularity, using Gutermann extends the time between machine services, so really, the few cents extra per spool pays for itself!
And while we're on the subject, who says it's expensive

thread? You can buy a small spool of 100 yds for $1.70 or so at most fabrics stores. Joann's puts their Gutermann thread on sale at 50% off very regularly--I think about once a month. That puts a small spool at about 85 cents. If you buy an economy spool (like my daughter is proudly showing off above and below) at half off, you will spend $4 for 1000 yards which works out to less than half the price per yard as the small spool. Not too shabby.
Lastly, I'll show off my current Gutermann collection because it makes me happy to think of how many projects I will get out of all those lovely colors! :)

Saturday, February 13, 2010
My intro to soap making
 I love a good DIY project. It is so satisfying to know I saved money, did something useful, and cut one more item from our list of store-bought necessities, but even I know that making soap seems a little... pioneerish. However, I had a problem. My normal soap shop, Bluehouse Soaps, closed temporarily for a family move last summer and has still not opened. Thankfully, just before closing, I ordered almost a year's worth of soap and hoped they would be back in business when my stock ran out, but alas... my last bar of all-natural "mermaid soap" is gone. I had to make a choice... try out a new online store (which I might not like, would likely cost more, and I would have to order a lot to justify the shipping), switch to all-natural soaps from a store (which aren't nearly as nice as homemade ones), or just make it myself.
Why even both with natural soaps? It's mostly a sensitivity issue for our family. All four of us react in one way or another to agents in most commercial soaps. I have to be extremely careful with Ginny's soap because commercial soaps make her miserable, but many natural soaps dry her skin too much, so it has to contain oatmeal and other natural moisturizers... try finding a soap like that at Target! I am also leery of introducing unnecessary chemicals when they can easily be avoided. Who knows what's harmful and what's not, so I'd rather skip the SLS, phthalates, and perservatives when there are plenty of chemical-free alternatives.
So, back to the soap making. After a shower with my shrinking bar of "mermaid," I set out to find out how hard it would be to make myself. I mean, I wasn't going to mix animal fat and ashes, but if there was an easier method it might be worth a shot. And I found one! A method known as "melt and pour" is the perfect start to making soaps just the way you want them with none of the nitty-gritty. Simply put, you buy a soap base, melt it and add your "extras" and let it harden again!
 Like I said, we have sensitivity problems and Ginny needs that moisturizing element, so I went with two high-quality bases from Brambleberry: one made with olive oil for moisturizing properties and one made with goat's milk for soothing properties. I got a couple of nice scents for Hannah and I, one that smells like oranges and strawberries, and one that smells like cookies. For Ginny and Lee who react to scents, I got some grapefruit essential oil which, in my experience, smells just like lemon meringue pie when it's put in soap! I had intended to mix the bases together, but just for fun, I separated them in layers and scented it like cookies for my first bar. The bottom base (goat's milk) is normally a pure white, but I mixed in organic baby oatmeal.
Isn't it beautiful??? Who needs expensive soap molds when you have an empty margarine container! The soap smells like heaven too. In fact, my husband was so inspired by the delicious scent that he decided to make chocolate chip cookies while the soap hardened in the kitchen. Unfortunately, I had to cut the lovely bar in half so it would fit on a soap deck, but in doing so separated the two layers. They seemed to have melted together again, but I don't know how permanently! I guess mixing bases is a better way to start after all.
My last "mermaid" is now completely used up, so I put my new soap to use this week and I have to say I'm impressed! The goat's milk base lathers up very nicely for a homemade bar soap and with all the extra moisturizing parts (olive oil, oatmeal, and goat's milk), my skin felt even softer afterwards than normal!
Thursday, February 11, 2010
Paper doll chains
 This is a fun and easy craft for elementary-aged kids! Using a folded piece of paper, make a chain of dolls (or fairies, princesses, people, gingerbread men, etc.) to decorate! Your kids will love seeing their shapes unfold all holding onto the hand of the doll/fairy/person next to them!
You will need:

Paper
Scissors
Craft supplies to decorate with, for example:
Crayons, pens, markers, colored pencils, etc.
Aluminum foil
Colored paper pieces
Yarn
Glitter glue
Tulle
Tape
Magazines
Bits of fabric
Ribbon
Start by folding your paper in half the long way. Then fold it twice in the other direction. It helps your design to lay flat if you make these folds accordion-style. Next trace the outline of the shape you will cut out on the top section of your paper just like you were drawing on the front of a homemade card. Make sure that the hands extend to both sides of rectangle. I have created a couple of ideas for shapes here... the first can be used as a princess or a wizard and the second as a ballerina or a fairy. Once your design is drawn, cut it out through all the layers EXCEPT for the hands. Those need to remain attached on both sides for the chain effect to work. When you unfold them you will have two separate chains of dolls. You may use them separately, or tape them together. Depending on how you choose to decorate, you may wish to tape them together after they are decorated, or temporarily just from the backside.
Now use your imagination and supplies to create 8 different versions of your shape! You can use fabric bits to create clothes, yarn pieces for hair or beards, colored paper for wings, aluminum foil to look like metal pieces or add shine, cut faces or hands out of magazines for your people, glue some ribbon to your princess' pointy hat... you name it! Get creative and have fun!
Wednesday, February 10, 2010
Wordless Wednesday: Valentine's Day mug cozy
 Doesn't this mug cozy make you feel warm and fuzzy inside? Using a simple stranded knitting (also known as Fair Isle knitting) pattern makes this mug cozy even thicker and warmer. It is a small project and uses worsted weight yarn and US 8 needles, so even those of us new to stranded knitting should be able to finish this for our loved ones by Valentine's Day!
 Click here for the designer's website, the story behind the cozy, info on the yarn and on Fair Isle/stranded knitting. For the free pattern, look for the link in between the two cozy pictures on her site (Classic Elite Yarns).
Monday, February 8, 2010
Intarsia knitting
This first row of intarsia knitting on my afghan has a white moss stitch border, a square of white, a square of watermelon (raspberry pink), a square of white, a square of blue mint (turquoise), and another white border. All told, five skeins of yarn going at once! Normally, intarsia knitting is done with smaller patterns where you can trail a couple of yards of yarn behind the work or create small "bobbins" by winding up a section of yarn so it pulls from the center (see photo below).
 Unfortunately, since each block of my blanket will require nearly a whole skein, there is no way to get around working with so many full skeins at once. The main hang up I am having now is having to untwist all of them from each other at the end of a few rows! But I am enjoying the color changes, the new technique, and seeing the project slowly take shape. Blanket progress: 5 inches down, 55 inches to go! Oy.
Here is an excellent video on intarsia knitting, shown in both Continental and English styles: http://www.knittinghelp.com/videos/advanced-techniques Scroll about 2/3 of the way down to "How to knit with 2 colors at a time" and intarsia knitting is the second technique.
And here is the backside with the strands twisted around each other at each color change.
I realize my yarn is in a maternity clothes shopping bag, but I am not making any subtle announcements! It was just left over from a baby shower and a handy size. :)
Saturday, February 6, 2010
Adventures in cable knitting
 Up until recently I have been a rather timid knitter. I was content to knit and purl on straight needles and stuck to single-color patterns that required as few increases and decreases as possible, and preferably on nothing smaller than US 6 needles. I finally decided last month that, since I have been knitting off and on for the last five years, it is time to move on to some more advanced techniques.
My first major discovery was ravelry.com! Yes, a majority of the patterns they list are not free, but there are so many that it doesn't matter! Excellent, cute, creative, impressive, stunning, and unique free patterns abound even if they are not the majority! One morning I casually browsed through patterns I ended up with ten saved that I "had to make," so it's plenty to keep even the most skilled knitter busy for years! I picked one called "Tillamook Cabled Hat" by Rilana Knits mostly because I loved the look and second, because I love the Pacific Northwest and Tillamook cheese, so the title made me happy!
My first challenge: learning a cable cast-on. This site was extremely useful, with videos for both Continental- and English-style knitting. The cast-on itself wasn't hard at all... so why, you might ask, was I struggling and grumbling and hurling curses for three hours straight trying to cast-on a silly hat??? I'll blame that on my double-pointed needles. I had never previously used DPNs, but friends had assured me that they are harmless good fun and nothing to be scared of. Now surely a somewhat experienced (and timid) knitter like myself would be able to tackle them without a sweat, but apparently DPNs, cable cast-ons and myself do not work well together. Maybe the relationship just needs some work. In any case, at long last, I was fully cast-on and ready to start knitting-in-the-round.
After the cast-on, DPN's became increasingly less aggravating with each row, and by the time my 1 1/2 inches of hat ribbing was complete I started to pick up pace. After conquering those two hurdles, the challenge I had originally been scared to face, cabling, was a piece of cake. It was an "....oh, that's it?" moment in knitting for me. My progress so far is in the picture at the top of this post.
So take it from me, if you can knit and purl, don't be afraid of cabling! But you can go ahead and be afraid of your needles. After all, there's ten pointy ends to watch out for in a pack of DPNs. That's a lot of points.
Thursday, February 4, 2010
Meet Kendra
 I just love this little doll! Kendra is 12" tall, has chocolate brown skin, espresso brown hair, black eyes, and rosy cheeks. I adore the print on her skirt... in fact, it is made from a remnant of fabric left over from an outfit I made for my own daughter's "baby." It is light pink with small doodles of hearts, flowers, four-leaf clovers, and bugs, and is covered with cursive-writing words like "play," "dance," "believe," etc.
My favorite thing about Kendra's outfit is her hand-knit cotton tank top. I came up with the pattern for it specifically for this doll and it turned out so cute! It has a small band of ribbing on the bottom, stocking stitch on the body, and garter stitch on the straps. It buttons in the back for easy removal and looks so cute even without the layering shirt! I can see myself making lots of these tanks for summer dolls.
Visit my Etsy shop!
Wednesday, February 3, 2010
Wordless Wednesday: Amigurami
Come visit Stitch and Stuff on Wednesdays for a some amazing and inspiring craft ideas! I will post photos and links to projects that I think look fun and creative, but I haven't tried yet!
This week: Amigurami! In other words, tightly crocheted or knitted stuffed animals and toys, often with oversized heads.
 An adorable little (and easy!) amigurami gnome!
Link to the pattern and blog

Easy ice cream cones! These ones contain small plastic cups for rigidity plus stuffing. Link to blog and pattern
 One of those oversized heads I was talking about: an adorable bear named Zequi! Link to the pattern and blog

Amazing (and difficult) dragon pattern!
This week: Amigurami! In other words, tightly crocheted or knitted stuffed animals and toys, often with oversized heads.
An adorable little (and easy!) amigurami gnome!Link to the pattern and blog
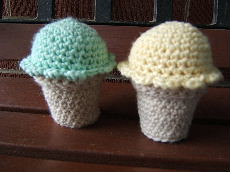
Easy ice cream cones! These ones contain small plastic cups for rigidity plus stuffing. Link to blog and pattern
One of those oversized heads I was talking about: an adorable bear named Zequi! Link to the pattern and blog
Amazing (and difficult) dragon pattern!
Subscribe to:
Comments (Atom)

